Architecture diagrams
Documentation is like sex: when it is good, it is very, very good; and when it is bad, it is better than nothing.
Got your attention? Alright!
Writing documentation is rarely a welcome task and people usually shy away with various types of excuses. Like it is hard to keep the documentation up-to-date or ain’t nobody got time for that. And sometimes the piece of software that should be documented is in a state that rather justifies a complete re-write than many hours of labor to document it. Still, when you stumble upon a new code base every bit of documentation can help and save hours of headaches.
A corner-piece of every good documentation is proper architecture diagrams and this justifies a closer look at any help we can get. Therefore this blog post showcases Struturizr along with three different ways of building up a model which can be used to create C4 views:
-
Creating the model manually
-
Scraping code with go-structurizr
-
Using a Golang domain-specific language with goadesign
|
Everything is again based on our well-known Todo-application basically used in every other post of this blog. |
Introduction time &
There are many ways to create software architecture diagrams and most of them heavily utilize UML. If you have ever seen UML it can be difficult to write and even more difficult to read even for the targeted audience later. And once done the resulting documentation is stowed away in rare places like a company file share in various formats of the Office-family or sometimes even worse in a semi-unstructured Confluence.
Struturizr follows a slightly different approach and provides its own sets of elements and relationships to establish a simple model in a documentation-as-code fashion. Once defined this model can be used to extract different views like the system context to see an overview of the system, its neighbours and actors or the container diagram to basically list all deployable units in rendered diagrams and a live view in any browser.
Both named views are part of the C4 model and represent the first two of the four (HINT: CCCC) letters of the model. The two missing are the component diagram and the code diagram which provide further and more fine grained details of container internals respective the structure of the actual code base.
Next up is how to create an actual model.
Creating the model manually &
Structurizr comes with its own DSL to describe both the model with various elements and their relationship to each other and the actual views we would like to see.
The actual language is quite easy to understand and read, so let us directly head into a short example:
workspace {
    model { (1)
        user = person "User" (2)
        softwareSystem = softwareSystem "Todo Software System" { (3)
            frontend = container "Web Frontend" { (4)
                user -> this "Uses" (5)
            }
            backend = container "Web API" {
                frontend -> this "Makes API calls to"
            }
            container "Database" {
                backend -> this "Reads from and writes to"
            }
        }
    }

    views { (6)
        systemContext softwareSystem { (7)
            include *
            autolayout lr
        }

        container softwareSystem { (8)
            include *
            autolayout lr
        }

        theme default
    }
}| 1 | This block contains all elements of the model |
| 2 | Actors should be part of every system, so welcome our sole user |
| 3 | The system is the main entry point and describes the actual software |
| 4 | Container are the building blocks of the model |
| 5 | Expressions are used to define a relationship from one element to another in arrow direction |
| 6 | The next bigger block contains the actual views |
| 7 | This defines the system context diagram |
| 8 | And this the container diagram |
There are various ways to generate the actual model:
-
Head to https://struturizr.com and upload the model there
-
Install the struturizr-cli and convert it on the shell
-
Fire up the struturizr-lite container locally
Creating an account isn’t that attractive, as is the installation of dozens of packages, so let us pick the third option and start Podman (or any other engine if you insist).
Generating the model &
Since we just have to download and run the container, the only thing we have to do in advance is take the model from above and store it into a file locally.
|
The tooling supports the file extensions |
Once everything is set let us fire up the container:
$ podman run -it --rm -p 8080:8080 -v .:/usr/local/structurizr \
  -e STRUCTURIZR_WORKSPACE_FILENAME=todo-system docker.io/structurizr/lite
...
2024-07-08T15:10:03.792Z  INFO 1 --- [           main] com.structurizr.lite.StructurizrLite     : Started StructurizrLite in 10.637 seconds (process running for 10.983)
2024-07-08T15:10:03.794Z  INFO 1 --- [           main] com.structurizr.lite.StructurizrLite     : ***********************************************************************************
2024-07-08T15:10:03.794Z  INFO 1 --- [           main] com.structurizr.lite.StructurizrLite     :   _____ _                   _              _
2024-07-08T15:10:03.794Z  INFO 1 --- [           main] com.structurizr.lite.StructurizrLite     :  / ____| |                 | |            (_)
2024-07-08T15:10:03.794Z  INFO 1 --- [           main] com.structurizr.lite.StructurizrLite     : | (___ | |_ _ __ _   _  ___| |_ _   _ _ __ _ _____ __
2024-07-08T15:10:03.794Z  INFO 1 --- [           main] com.structurizr.lite.StructurizrLite     :  \___ \| __| '__| | | |/ __| __| | | | '__| |_  / '__|
2024-07-08T15:10:03.794Z  INFO 1 --- [           main] com.structurizr.lite.StructurizrLite     :  ____) | |_| |  | |_| | (__| |_| |_| | |  | |/ /| |
2024-07-08T15:10:03.794Z  INFO 1 --- [           main] com.structurizr.lite.StructurizrLite     : |_____/ \__|_|   \__,_|\___|\__|\__,_|_|  |_/___|_|
2024-07-08T15:10:03.794Z  INFO 1 --- [           main] com.structurizr.lite.StructurizrLite     :
2024-07-08T15:10:03.794Z  INFO 1 --- [           main] com.structurizr.lite.StructurizrLite     : Structurizr Lite
2024-07-08T15:10:03.796Z  INFO 1 --- [           main] com.structurizr.lite.StructurizrLite     :  - build: 2024.07.02 (2024-07-02T12:09:42Z)
2024-07-08T15:10:03.797Z  INFO 1 --- [           main] com.structurizr.lite.StructurizrLite     :  - structurizr-java: v2.2.0
2024-07-08T15:10:03.802Z  INFO 1 --- [           main] com.structurizr.lite.StructurizrLite     :  - structurizr-dsl: v2.2.0
2024-07-08T15:10:03.802Z  INFO 1 --- [           main] com.structurizr.lite.StructurizrLite     :  - structurizr-import: v2.2.0
2024-07-08T15:10:03.803Z  INFO 1 --- [           main] com.structurizr.lite.StructurizrLite     :  - structurizr-graphviz: v2.2.0
...
The output is a bit messy, but once you see the above point your browser into this direction http://localhost:8080 and you should be greeted with something similar to this screenshot:
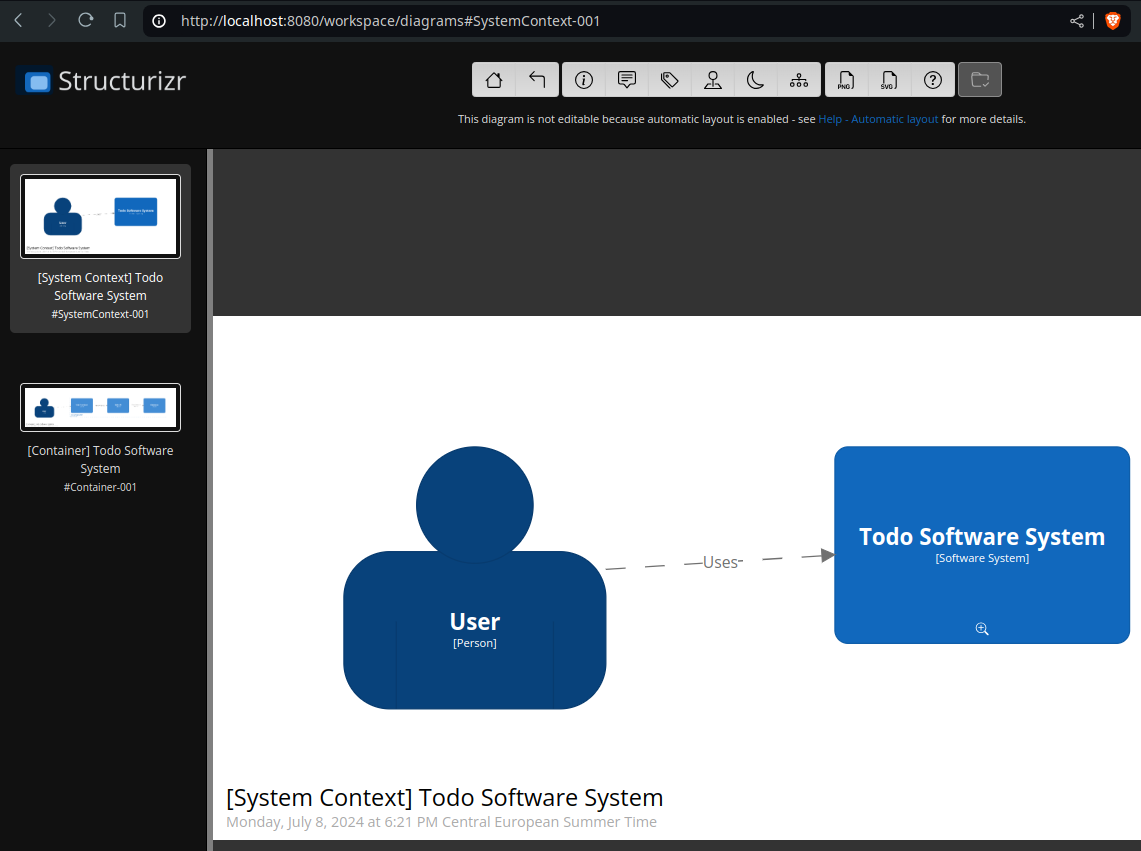
The webpage itself is a simple viewer, that allows to cycle through the defined views, is also
capable of editing the diagrams directly and allows to convert and store them as .png or
.svg to your disk.
In comparison to the cloud version it lacks the feature to embed diagrams, but there are
others ways of archiving that if needed.
|
Modification of the example from above isn’t possible unless you disable autolayout in the example. |
Conversion to Plantuml &
The webview itself doesn’t support other formats than the two from above, but the CLI is capable of keep us documentation-as-code enthusiasts happy. It is probably a matter of taste and Mermaid is a supported and strong competitor, but since most of the diagrams inside of this blog are PlantUML we stick to it.
This time we need another container with the actual CLI:
$ podman run --rm -v .:/usr/local/structurizr docker.io/structurizr/cli \
    export --workspace todo-system.dsl --format plantuml/c4plantuml --output diagrams/
...
Exporting workspace from todo-system.dsl
 - exporting with StructurizrPlantUMLExporter
 - writing /usr/local/structurizr/diagrams/structurizr-SystemContext-001.puml
 - writing /usr/local/structurizr/diagrams/structurizr-SystemContext-001-key.puml
 - writing /usr/local/structurizr/diagrams/structurizr-Container-001.puml
 - writing /usr/local/structurizr/diagrams/structurizr-Container-001-key.puml
 - finished
And if we render the result e.g. from the file diagrams/structurizr-SystemContext-001.puml
we can see following output:
Scraping the code &
As the name probably implies go-structurizr is based on Structurizr and creates the model automatically from scraped code per runtime.
Generating the model &
In order to do there is a bit of configuration required to mark and kind of style what we would like to see.
The first one is scraper.yml to define which packages and paths should be inspected:
configuration:
    title: Todo Software System
    pkgs: (1)
        - "github.com"

rules: (2)
    -   name_regexp: ".*"
        pkg_regexps:
            - ".*/adapter"
        component:
            description: "adapter component"
            tags:
- ADAPTER| 1 | This limits the scraper to packages from Github |
| 2 | Rules connect packages, components and tags with each other |
And the second one view.yaml instructs the viewer how everything should look:
view:
    title: Todo service components
    line_color: 000000ff
    styles: (1)
        -   id: ADAPTER
            background_color: 2d69b7ff
            font_color: ffffffff
            border_color: 000000ff
            shape: artifact
    root_component_tags:
        - ADAPTER
    component_tags: (2)
- ADAPTERConversion to Plantuml &
Once both configs are set we can write the actual program:
func main() {
	scraper, err := structScaper.NewScraperFromConfigFile("scraper.yaml") (1)
	if err != nil {
		panic(err)
	}

	/* Create business stuff */
	var todoRepository *infrastructure.TodoFakeRepository

	todoRepository = infrastructure.NewTodoFakeRepository()

	defer todoRepository.Close()

	todoService := domain.NewTodoService(todoRepository)
	todoResource := adapter.NewTodoResource(todoService)

	structure := scraper.Scrape(todoResource) (2)

	view, err := structView.NewViewFromConfigFile("view.yaml") (3)
	if err != nil {
		panic(err)
	}

	outFile, err := os.Create("c4.plantuml")
	if err != nil {
		panic(err)
	}
	defer outFile.Close()

	err = view.RenderStructureTo(structure, outFile) (4)
	if err != nil {
		panic(err)
	}
}| 1 | This instructs the scraper which packages are interesting and how they should be tagged |
| 2 | The scraper does whatever a scraper does |
| 3 | Here we source the styling informationen of the diagram |
| 4 | And finally the output file is rendered to disk |
When run the final output of the created file c4.plantuml file looks like this - depending on
the Grahpviz gods your mileage may vary:
Using a domain-specific language &
The third example mixes both previous ways together and intertwines the power of Golang and DSL with the flexibility of Structurizr.
Generating the model &
The previous examples contained the absolute basics for the hands-on feeling, but it is about time to show off a bit. So following example is more complete and demonstrate how easy it is to write everything together:
var _ = Design("Todo design", "This is a design of the todo service", func() {
	Version("0.1")
	Enterprise("Todo Showcase Service")

	var system = SoftwareSystem("Software System", "The todo software system", func() { (1)
		Tag("system")
		URL("https://unexist.blog")

		container_webserver = Container("Webserver", "A webserver to deliver the frontend", "Nginx", func() { (2)
			Tag("infrastructure")
			URL("https://nginx.org/")
		})

		container_frontend = Container("Web Frontend", "A Angular-based web frontend", "Angular + REST", func() {
			Tag("frontend")

			Uses("Webserver", "Is delivered by", "HTTP", Asynchronous)
			Uses("Web API", "Makes API calls to", "HTTP", Asynchronous)
		})

		container_backend = Container("Web API", "A backend service", "GinTonic + REST", func() {
			Tag("backend")

			Uses("Database", "Reads from and writes to", "SQL/TCP", Asynchronous)

			Component("Todo Service", "Domain logic for todo", "Golang", func() {
				Tag("service")
			})
		})

		Container("Database", "A RDBMS to handle the data", "Postgresql", func() {
			Tag("infrastructure")
			URL("https://postgresql.org")
		})
	})

	DeploymentEnvironment("Dev", func() { (3)
		DeploymentNode("Cloud", func() {
			ContainerInstance("Software System/Webserver")
			ContainerInstance("Software System/Web Frontend")
			ContainerInstance("Software System/Web API")
			ContainerInstance("Software System/Database")
		})
	})

	Person("User", "A user of the software system.", func() { (4)
		Tag("person")

		Uses(system, "Uses")
		Uses("Software System/Web Frontend", "Creates, views, edits and delete todos using", "HTTP", Asynchronous)
	})

	Views(func() { (5)
		SystemLandscapeView("SystemLandscapeView", "A System Landscape View", func() {
			Title("Overview of the system landscape")
			AddAll()
			AutoLayout(RankLeftRight)
		})

		SystemContextView(system, "SystemContext", "A System Context diagram.", func() {
			Title("Overview of the system")
			AddAll()
			AutoLayout(RankLeftRight)
		})

		ContainerView(system, "ContainerView", "A Container View", func() {
			Title("Overview of the containers")
			AddAll()
			AutoLayout(RankLeftRight)
		})

		ComponentView(container_frontend, "ComponentView Frontend", "A Component View of the web frontend", func() {
			Title("Overview of the frontend components")
			AddComponents()
			AutoLayout(RankLeftRight)
		})

		ComponentView(container_backend, "ComponentView Backend", "A Component View of the web backend", func() {
			Title("Overview of the backend components")
			AddComponents()
			AutoLayout(RankLeftRight)
		})

		DeploymentView(Global, "Dev", "deployment", "A Deployment View", func() {
			Title("Overview of the deployment on Dev")
			AddAll()
			AutoLayout(RankLeftRight)
		})

		Styles(func() { (6)
			ElementStyle("infrastructure", func() {
				Shape(ShapeComponent)
				Background("#1168bd")
				Color("#ffffff")
			})
		})
	})
})| 1 | System is the main entry point and supports various additional information |
| 2 | As before, container describe the building blocks of the system |
| 3 | Deploy environments allow to define deployment stages |
| 4 | Person is again the actor of the system |
| 5 | There is broad range of different views than can be defined here |
| 6 | And styles handle again the visual cues the model |
Goadesign follows a batteries included approach and comes with two CLI tools:
Generate the model and serve it locally |
|
Upload the model to https://structurizr.com |
The next steps are close to the ones of plain Structurizr, but require far less overhead like containers (at the cost of installation):
$ go install goa.design/model/cmd/mdl@latest
...
$ mdl serve github.com/unexist/showcase-architecture-documentation/model
Watching: /home/unexist/projects/showcase-architecture-documentation/todo-service-goadesign/model
mdl v1.9.8, editor started. Open http://localhost:8080 in your browser.
And if you point your browser to http://localhost:8080 you should see something like this:
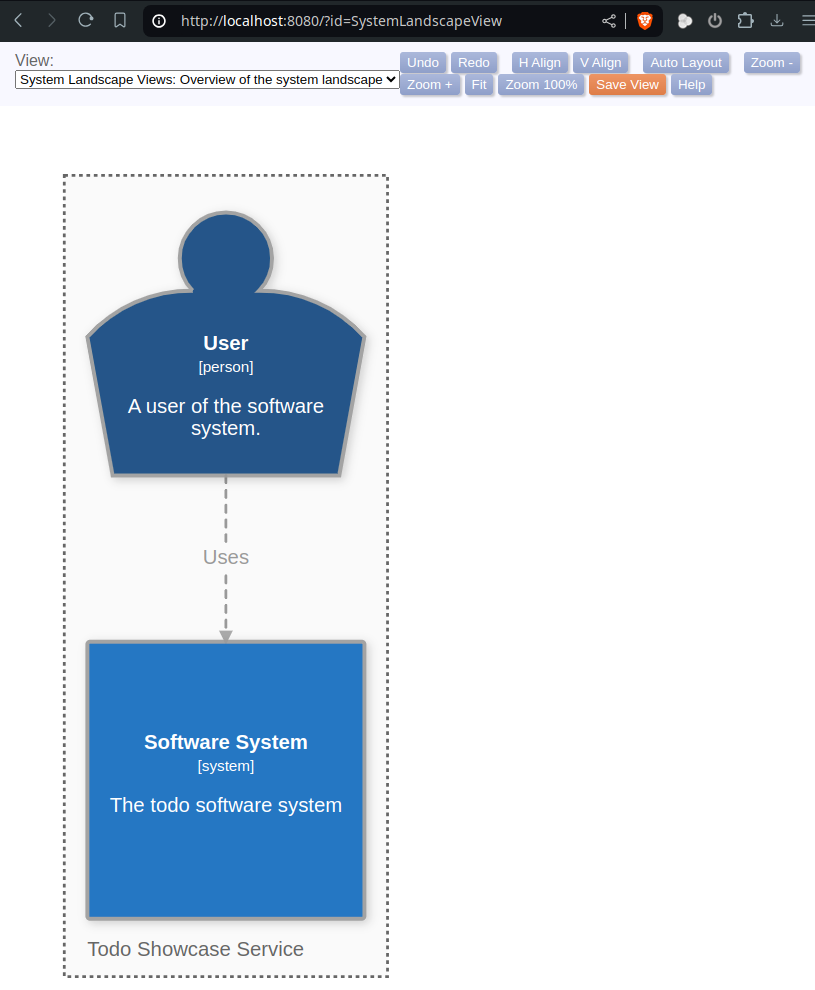
This webview directly allows modification and there is also a limited exporter to .svg.
Conversion to Plantuml &
Conversion to PlantUml is bit more tricky (like it usually is), since there is no native way in goadesign to archive that.
$ go install goa.design/model/cmd/stz@latest
...
$ stz gen github.com/unexist/showcase-architecture-documentation/model -out todo.json
$ podman run --rm -v .:/usr/local/structurizr docker.io/structurizr/cli \
    export --workspace todo.json --format plantuml/c4plantuml --output diagrams/
Exporting workspace from todo.json
 - exporting with StructurizrPlantUMLExporter
 - writing /usr/local/structurizr/diagrams/structurizr-SystemLandscapeView.puml
 - writing /usr/local/structurizr/diagrams/structurizr-SystemLandscapeView-key.puml
 - writing /usr/local/structurizr/diagrams/structurizr-SystemContext.puml
 - writing /usr/local/structurizr/diagrams/structurizr-SystemContext-key.puml
 - writing /usr/local/structurizr/diagrams/structurizr-ContainerView.puml
 - writing /usr/local/structurizr/diagrams/structurizr-ContainerView-key.puml
 - writing /usr/local/structurizr/diagrams/structurizr-ComponentView Backend.puml
 - writing /usr/local/structurizr/diagrams/structurizr-ComponentView Backend-key.puml
 - writing /usr/local/structurizr/diagrams/structurizr-ComponentView Frontend.puml
 - writing /usr/local/structurizr/diagrams/structurizr-ComponentView Frontend-key.puml
 - writing /usr/local/structurizr/diagrams/structurizr-deployment.puml
 - writing /usr/local/structurizr/diagrams/structurizr-deployment-key.puml
 - finished
Once again if we render the result e.g. from the file diagrams/structurizr-SystemContext.puml:
Conclusion &
All the ways ease the creation of architecture diagrams and allow to either convert them directly into documentation-as-code formats or statically serve them. This doesn’t ease the cognitive load to actual create the model, but the put the fun back into playing with new tech and write code for visualization.
Structurizr offers a powerful and easy way to create and update architecture diagrams and is already entitled to be enterprise ready. go-structurizr is a nice addition to the idea, but due to the automatic scraping might require a bit of tinkering to see the desired results. And lastly goadesign is the batteries-include approach of the two others and combines their powers nicely into a simple package.
Pick whatever you prefer, but please write documentation. Future you will thank you.
All examples can be found here: